Attention2

Sunday 28 September 2014

Monster High Beanie

Hello everyone! 

I just had to update you on the crochet Brain Waves beanie pattern that I used for my interpretation of a Monster High Beanie.  I have been looking around for some 'Scull' buttons.  A reader referred me to 'Buttons By Benji' who has some really cool handmade buttons!

She is on Face Book:
https://www.facebook.com/pages/Buttons-by-Benji/430073687129432

Her blog is: http://www.buttonsbybenji.blogspot.co.nz/

Do drop by her pages.  You will be amazed at the variety and quality of her hand-made buttons.  From her I purchased my buttons named 'Bones' in her catalogue.  The delivery service was super quick.  So many thanks Nicci!

And a big thank-you to Mara Andrews for the referral.


My original pattern I used named 'Brain Waves' was a free pattern by

McQueen from Playin' Hooky Designs


The crochet flower pattern I used was by Yolanda:
https://www.youtube.com/watch?v=U8fgGFfyH8A


If you found this post interesting please Subscribe, Like & Share with friends, family and your Circles.  Comments are most welcome. 
Thank you ......

 Make Your Own Decals

Saturday 27 September 2014

Free Traffic

What is HitLeap?

HitLeap is a Traffic Exchange service, delivering free traffic to any website, on-demand.
We help you increase your website traffic, rankings and more.
Our affiliate program lets you earn cash and traffic commissions of up to 50%.

How does it work?
After signing up, you will submit all the websites you want to send hits to.
Then you will get traffic by viewing other people's websites.
Alternatively, you could buy a traffic package from us.

 Take the time to look into this site.  It works.  I am using it for free.


Thursday 25 September 2014

Z Flap Photo Album


Hi everyone, it's Friday!  The end of another week.  Boy don't they fly by?  I have been busy with another video for YouTube and it is ready to share with you.  In the past six months or so I have been right into creating photo-albums.  Having perused the internet for what I wanted, I tried a few out. 

Some successful and others I won't try again.  You know how it is.  Some designs work out for you and others just don't.  I found this tutorial by Laura Denison who has a number of videos/tutorials on YouTube and her website.  She has an amazing head for designing from card-stock and paper. 

Some of her projects are free to download instructions and others require payment.  Fair enough when you see just how much work goes into designing, writing and putting together a video. I wish I had her patience.

So, the Z Flap Photo Album is about a 6 x 8" in size.  It opens from bottom to top (landscape view) instead of a traditional book method.  Each page (front & back) will hold eight photos/journaling.  Plenty of space.  The paper pad I used was by Webster's Pages which I purchased from Just scrapping.  And the card-stock was from Stampin-Up; Whisper White & Very Vanilla.

I had a lot of fun constructing this album and can't wait to put some photos in.  I have put a link to my video which takes you through all the pages.  It is not instructional as I think Laura's video says it all.  So please take a look.
 
 
 If you found this posting interesting please Subscribe, Like, and Share with friends, family and your circles. Comments are most welcome.  Thank you.....

Saturday 20 September 2014


Boxed Corner Pocket Tissue Holder
 
Here is today's project/tutorial an adorable 'Boxed Pocket Tissue Holder'.  These are so darn cute!  I have made so many of these using up scrap pieces of material for something that has a good use. 

Perfect for one of those last minute gifts.  As a thank-you.  And what could be better for a teacher's gift.  Imagine them made up from Christmas material!  My brain is in overload thinking of the possibilities. 

I promise you when you have made one you won't stop there.  Here I have given my written tutorial and if that is not clear enough I have put the link to my YouTube video.  Enjoy!


'Boxed Corner Pocket Tissue Holder'

A quick and easy sewing project to make as a gift in only half an hour.  Use up scraps of material you have left over from other projects.

Fabric:
Cut one piece 6 ¼” x 6 ¾” (outer fabric)
Cut one piece 6 ¼” x 7 ¾” (inner fabric)
Tools:
Cotton
Scissors
Rotary cutterPins
Cutting board
Sewing machine
Iron
Instructions:
  1. Cut your fabric in contrasting colours/patterns.
  2. Sew the short ends good sides together using a ¼” seam allowance. 
  3. The outer fabric is shorter than the inner so just take it over and sew accordingly.  Then press with the iron.  This is how it should look.


You will have a border of inner fabric showing on both sides.  This is correct.
 4.  With the top side upwards mark the centre of fabric on the long sides.  This is to be your guide. 


5.  Bring up both sides to the centre marks and pin into place. 
6.  Machine stitch across reinforcing the centre connections.
7.  Trim the edges and use an overcast stitch to neaten off.


8.  To box the corners spread your corner side seam with the crease line formed.  Align them and pin approximately ½” down horizontally.   


9.  Machine stitch. 


           10.  Trim off the corner.


11.  Trim off any hanging threads and then turn right side out.  Push out all four corners with your fingers or a blunt tool. 


        12.  Place in your pocket tissues.


Voila!  Your ‘Boxed Corner Pocket Tissue Holder’ is complete.


 If you found this tutorial interesting please like/share on Facebook/Twitter with friends and family.  Thank you.

 Video link:

Boxed Corner Tissue Holder

Wednesday 17 September 2014

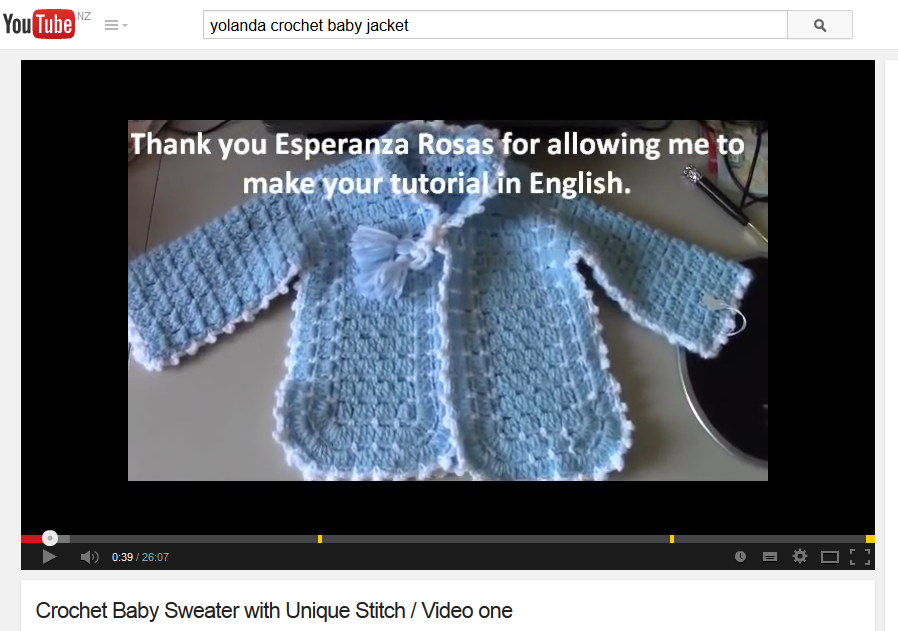
Unique Crochet Stitch Baby Jacket

I just had to share this pattern with you crocheters out there.  I was looking for a baby jacket to crochet for a friend's new baby daughter and I went searching on YouTube.  I was looking for something different to what I have done before, and came across this video by Yolanda.  Though not her original pattern.  

It was written by someone else but in a different language.  Yolanda sought permission to translate it into English and has done a great job.  I think you will agree with me how cute it looks.  And above all it is sooooo easy to do.  No kidding.  It must be the easiest stitch and pattern to follow.  You have to try it to believe me.  

If you look closely the joining up is done on the good side with a simple picot stitch all around the edges.  The only thing I have done differently is to sew buttons on the front instead of ribbon.  Just a personal choice.  I urge you to look into her different videos.  There are many.  You will come across a hat/bonnet to go with the jacket.  I will be crocheting it soon as time permits.


Unique Crochet Stitch Baby Jacket
 If you like this posting please like, share by clicking on the buttons below.  

 ------- Let's Keep Crafting Alive! --------

Tuesday 16 September 2014

Tulip Card

Today's project is for card-makers out there.  I love to make cards for all occasions.  The tulip card I created is one that can be adapted for general greetings, birthdays, thank-you's, etc.

Keep the layout but change the tulip stamp to some other flower stamp.  Have fun with different lace border punches.  Try different colour combinations.

Sometimes I think you just need a basic layout to guide you and your imagination does the rest. I am including the instructions I wrote and use in workshop classes. Have Fun!


Tulip Card


Materials by StampinUp

Card stock:                   Very Vanilla
                                       Raspberry Ripple
                                       Whisper White

Ink Pads:                       Raspberry Ripple
                                       Gumball Green
Punch:                           Decorative Label
Border Punch:              Lace

Tools:                             12” cardstock trimmer
                                       Snail Adhesive
                                       Stampin Dimensionals
                                       Bone Folder

Stamp sets:                  Decorative Label ‘Four Frames’
Sentiments:                 ‘Petite Pairs’
Flower head:               ‘Organic Grace’
Tulip:                            ‘Garden Whimsy’
Gel Pen:                        White
                    -----------------------------------------------------------------------------------------------------------
Instructions:

1.   Cut the Very Vanilla cardstock to 11” x 8”
2.   Score on the long side at 5-1/2” & fold
3.   Cut the Raspberry Ripple cardstock at 5-1/4”x 1-1/2”
4.   Stamp design with Raspberry Ripple ink pad
5.   Cut the Whisper White cardstock at 1”x 5-1/4”
6.   Use a lace border punch on one side
7.   Adhere the lace border to the stamped Raspberry Ripple cardstock strip with snail adhesive
8.   Adhere both to the front of your card leaving a small border on three sides.
9.   Using the Tulip stamp ink the flower in Raspberry Ripple and the stem and leaves in 
       Gumball Green
10.  Huff and stamp the image onto the front of your card
11.  Stamp the Curly Label stamp with Gum Ball ink onto some Very Vanilla cardstock
12.  Stamp the sentiment with Gum Ball ink onto the stamped label
13.  Punch out with the Curly Label punch
14.  Cut a strip of Raspberry Ripple cardstock 6”x 3/4”
15.  Bend around the stamped Curly Label to look like a ribbon
16.  Adhere both to the front of your card using Snail Adhesive for the ribbon and Dimensionals
        for the label
1.    With a White Gel Pen add faux stitch lines to the ribbon.
2.   On the inside of your card stamp a sentiment.
If you enjoyed this post and tutorial please leave a comment, like and share with friends and family by clicking on the links below.  Thank you.....

  — Keep Crafting Alive —
                                                                                                   © Gail Duncan 23/04/13
 
Knitting for Profit link for further info: